How to Connect Qlik Cloud MCP to Gemini CLI and Antigravity via OAuth
- Mark Costa
- 4 days ago
- 3 min read


If you've been trying to connect the Qlik Cloud MCP server to an AI CLI tool and running into a frustrating "disconnected" status, you're not alone. This guide documents the confirmed working approach - using OAuth with a Native client type - and clears up the most common pitfall: passing a Bearer token in the headers field simply doesn't work.
This article was inspired by a thread on the Qlik Community forum and tested hands-on. A special thank you to Laurent Cornilleau (Qlik Employee) who confirmed that the connection works, and to Daniele Purrone (Principal Technical Support Engineer & SaaS Support Coordinator at Qlik) who clarified that the Gemini CLI - not the web app - is what supports MCP servers, and shared the OAuth documentation link that made this work. Your contributions to the community made this guide possible.
Overview
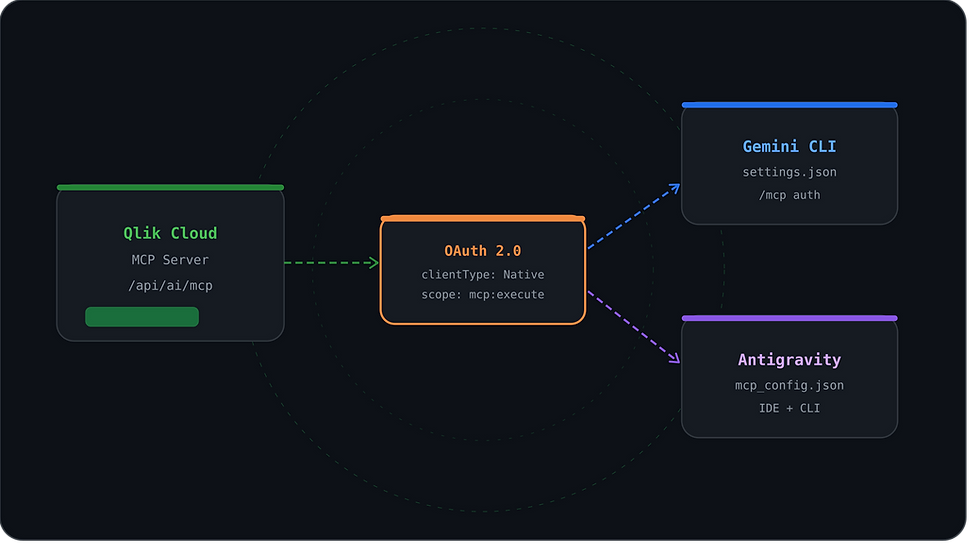
The Qlik Cloud MCP (Model Context Protocol) server exposes Qlik Cloud capabilities to AI CLI tools like Gemini CLI and Antigravity 2.0. Once connected, you can interact with your Qlik Cloud tenant through natural language - listing apps, creating sheets and charts, and more - directly from your terminal.
The key finding: you must use the OAuth flow with a Native client type and the mcp:execute scope. Passing a Bearer token directly in the MCP config headers will always fail.
Prerequisites
Qlik Cloud tenant with admin access to create OAuth clients
Gemini CLI or Antigravity 2.0 installed on Windows
Configured OAuth client with scopes user_default and mcp:execute must be available in your tenant
Step 1 - Configure the OAuth Client in Qlik Cloud
In the Qlik Cloud Management Console, navigate to OAuth clients and create a new client.
Set Client Type to Native.
Add Scopes: user_default and mcp:execute.
Set Published to No and Consent Method to Required.
Add both Redirect/Callback URLs: https://antigravity.google/oauth-callback http://localhost:7777/oauth/callback
Save and note down the Client ID - you'll need it in the config files below.
Step 2 - Configure Antigravity CLI (Windows)
Config file location:
C:\Users\<you>\.gemini\config\mcp_config.jsonAdd the following MCP server entry:
{
  "mcpServers": {
    "qlik-cloud-mcp": {
      "serverUrl": "https://<your-tenant>.us.qlikcloud.com/api/ai/mcp",
      "oauth": {
        "clientId": "<your-client-id>"
      }
    }
  }
}
Antigravity IDE shares the same configuration as Antigravity CLI. After updating the config file, simply re-authenticate from within the IDE.
Step 3 - Configure Gemini CLI (Windows)
Config file location:
C:\Users\<you>\.gemini\settings.jsonAdd the following MCP server entry:
{
  "mcpServers": {
    "qlik-cloud-mcp": {
      "url": "https://<your-tenant>.us.qlikcloud.com/api/ai/mcp",
      "oauth": {
        "clientId": "<your-client-id>",
        "redirectUri": "http://localhost:7777/oauth/callback"
      }
    }
  }
}
Step 4 - Authenticate in Gemini CLI
Open Gemini CLI and run the following command, replacing the server name with whatever you defined in your config:
/mcp auth qlik-cloud-mcpA browser window will open for the Qlik OAuth consent flow. After completing authentication, verify the connection:
/mcp listThe Qlik Cloud MCP server should now appear as connected.
Troubleshooting
Here are the most common issues and how to resolve them:
/mcp list shows server as disconnected — Bearer token in the headers field does not work. Use the OAuth clientId approach documented in the steps above.
OAuth callback fails - Ensure both redirect URLs are registered in your Qlik OAuth client: https://antigravity.google/oauth-callback and http://localhost:7777/oauth/callback.
Wrong OAuth client type - Use Native, not Web. The Web type requires a client secret exchange that Gemini CLI and Antigravity do not support in this flow.
Using the Gemini web app - The Gemini web-based interface does not support MCP servers. Only the CLI version does.
Final Thoughts
Connecting Qlik Cloud's MCP server to AI CLI tools opens up a powerful new way to interact with your tenant - querying apps, spaces, and data through conversational prompts rather than navigating the UI. The OAuth flow with a Native client is the right path, and once it's working, the experience is seamless.
If you're building Qlik Cloud integrations or exploring AI-driven analytics workflows, this is a great foundation to build on. As always, feel free to reach out via the Qlik Community or connect with us at Data Voyagers for more guides, tips, and implementations.
— Mark Costa | Data Voyagers


Comments